Disk Space Analyzer Max Online Tutorial

Are you curious about which files occupy most of your disk space? Disk Space Analyzer Max can show you each file on your disk in a straightforward visual way. Furthermore, you can remove large files directly using this tool if you find you don’t need them anymore.

Sponsored Links


In this tutorial, we cover the following topics: Introduction to the layout of the tool; How do I find large files that take up space? How to scan a disk? How to scan a folder? How to remove a selected file (permanently)? What can I do with the files selected in the treemap?
Main Features

  • Find and clean large files.
  • Simple and straightforward.
  • Multiple language support.

Introduction to the Layout of the Tool

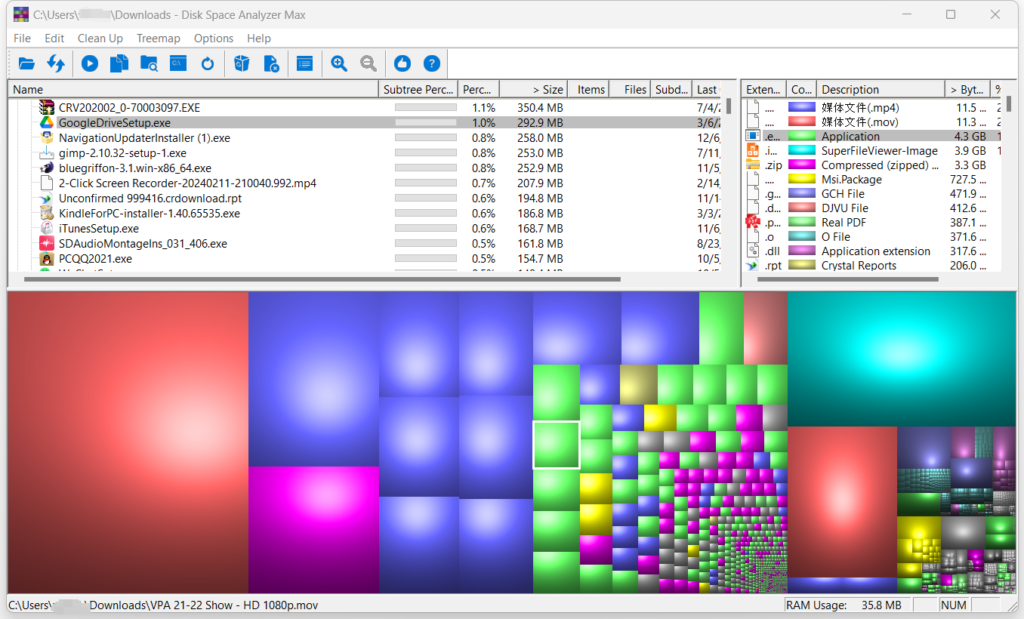
After scanning, the tool displays the results to you in the main UI. The layout of the main UI has three parts: file list, extension list and the treemap.

Sponsored Links

File List Panel

File list panel (marked as 1 in the image above) is located at the left top of the main UI. It shows you the detailed information of the folders and files.

Extension List Panel

Extension List Panel (marked as 2 in the image above) is located at the right top of the main UI. It shows you the detailed information of the file extension names.

Treemap Panel

The treemap panel (marked as 3 in the image above) is located at the bottom part of the main UI. In the treemap, each folder and file is represented by a rectangle. The rectangle’s size reflects the size of the folder or file that it represents. That said, the larger the rectangle, the large the folder or file that it represents. The rectangle’s color reflects the extension of the file (if it is a file).

How Do These Three Parts Work Together?

File list panel, extension list panel and the treemap panel are not isolated. Instead, they work together. When you select a folder or file in the file list panel, the rectangle representing this folder or file in the treemap panel will be automatically selected too and the corresponding extension (if it’s a file) will also be selected automatically. When you select a extension in the extension list panel, all the rectangles representing the files of this file extension will be automatically selected in the treemap panel. When you select a rectangle in the treemap panel, the folder or file it represents will be automatically selected in the file list panel and the extension will be automatically selected in the extension list panel.

How Do I Use Disk Space Analyzer Max?

This tool is very simple to use. You simply need to:
1, Select a disk/folder.
2, Click the “OK” button.
3, The app will scan the files and display the results to you in the main UI.

Sponsored Links

How Do I Scan a Disk?

As shown in the image above (marked as 1), you can select an individual drive or even all local drives to scan the files in it/them and display the results in the main UI.

How Do I Scan a Folder?

As shown in the image above (marked as 2), you can select a folder to scan all the files in it and display the results in the main UI.

How Do I Find Large Files Using this Tool?

To find the large files that take up your disk space, you need to scan your disk or folder and get the results displayed in the main UI first. Then you observe in the treemap panel and find the large rectangles. Now, click to select each large rectangle to see what it represents and decide whether it’s a large file that you don’t need anymore.

For example, in the image above, I would check at least the marked 5 large rectangles. I selected the large red rectangle (marked as 1) and found it is the file VPA 21-22 Show -HD 1080.mov in my downloads folder.

How Can I Remove a Selected File?

In the treemap panel, after you select a rectangle and decide it represents a large file that you don’t need to keep anymore, you can directly remove it in this tool. With the rectangle selected, click the menu “Clean Up” and then select “Delete (to Recycle Bin)” or “Delete (now way to undelete!)” to remove it.

Sponsored Links

Note: if you choose the “Delete (no way to undelete!”, the selected file will be permanently removed from your disk and there is no way to recover it. Please use caution.

What Else Can I Do with a Selected File in the Treemap?

As shown in the image above, with a selected file, other than removing it, you can:
– Open: open or run the file
– Explorer Here: open File Explorer to the file’s location
– Command Prompt Here: open command prompt to the file’s location
– Properties: view the properties of the file

E-mail Support

If you have any further questions or feed-backs about the app, please feel free to reach out to us by email. We are here to listen and help.