Screenshot Made Easy Online Tutorial

Need to take a screenshot? Try Screenshot Made Easy. Simply press the Print Screen key, select the area you want to capture, and your screenshot is ready. You can then edit the image, save it, or use it directly in another application.

Sponsored Links

In this tutorial, we cover the following topics: How to capture a screenshot? Where to find the captured screenshots? How to change the hotkeys? How to edit a screenshot image? How to add an external program as a destination?
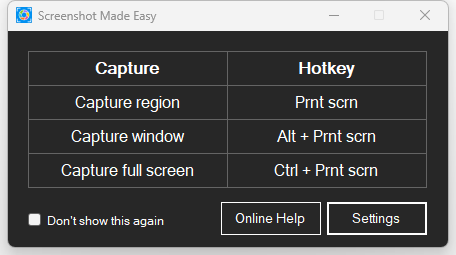
Main Features

  • Capture screenshots with a single keystroke
  • Edit screenshots easily during the capture process
  • Configure where screenshots are saved or sent
  • Add external programs as screenshot destinations

How to Capture a Screenshot?

If you haven’t changed the hotkeys, follow the steps below to capture a screenshot:

Sponsored Links

Step 1: Press the Print Screen key.

Step 2: When the crosshair cursor appears, move it to the area you want to capture and click the left mouse button to mark the top-left corner of the screenshot.

Step 3: While holding the left mouse button, drag the cursor to the bottom-right corner of the desired area, then release the button.

Step 4: The screenshot is now captured. Choose where you would like to save or send it.

If you have customized the hotkeys, simply press your configured key combination to start capturing.

Where to Find Captured Screenshots?

After a screenshot is captured, Screenshot Made Easy displays a menu that lets you choose what to do with the image.

Sponsored Links

Screenshot:

Available options include:

Save directly (using your preferred output settings) — Saves the screenshot silently to the configured output folder
Save As — Opens a dialog to choose the save location and file name
Copy to Clipboard — Copies the screenshot for immediate pasting
Send to Printer — Sends the screenshot directly to a printer
Microsoft Outlook — Opens Outlook (old version) and pastes the screenshot
Open in Image Editor — Opens the screenshot in the built-in image editor
MS Paint — Opens Microsoft Paint and pastes the screenshot
Paint.NET (if installed) — Opens Paint.NET and pastes the screenshot
Microsoft Excel — Opens Excel and pastes the screenshot
Microsoft PowerPoint — Opens PowerPoint and pastes the screenshot
Microsoft Word — Opens Word and pastes the screenshot
Microsoft Outlook — Opens Outlook and pastes the screenshot
Microsoft OneNote — Opens OneNote and pastes the screenshot
Windows OCR — Performs OCR and copies the extracted text to the clipboard
Windows Share — Opens the Windows Share panel

If you have already set a destination, the app will skip the menu and send the screenshot there automatically.

How to Change the Hotkeys?

To change the hotkeys, right-click the Screenshot Made Easy icon in the notification area (bottom-right corner of the screen) and select Preferences. In the Settings window, you can customize the hotkeys.

Sponsored Links

Screenshot:

How to Edit a Screenshot Image?

After capturing a screenshot, select Open in Image Editor from the displayed menu. The app will open the screenshot in the built-in Image Editor, where you can use the available tools to edit the image. Once you’re satisfied, you can save it or send it to other destinations.

How to Add an External Program as a Destination?

To add an external program as a destination, follow these steps:

Sponsored Links

1, Right-click the Screenshot Made Easy icon in the notification area (bottom-right corner of the screen) and select Configure External Commands.

2, In the External Command Settings window, click New.

3, In the Configure Command window, enter a name, the command, and any required arguments.

4, Click OK to close both windows.

5, Restart the app. After rebooting, the newly added external program will appear in the destination list.

E-mail Support

If you have any further questions or feed-backs about the app, please feel free to reach out to us by email. We are here to listen and help.